In this article, we will show you how to use Microtronics tools in development to create a ready-to-use IoT app for your applications in no time.
The workplace of the IoT developer
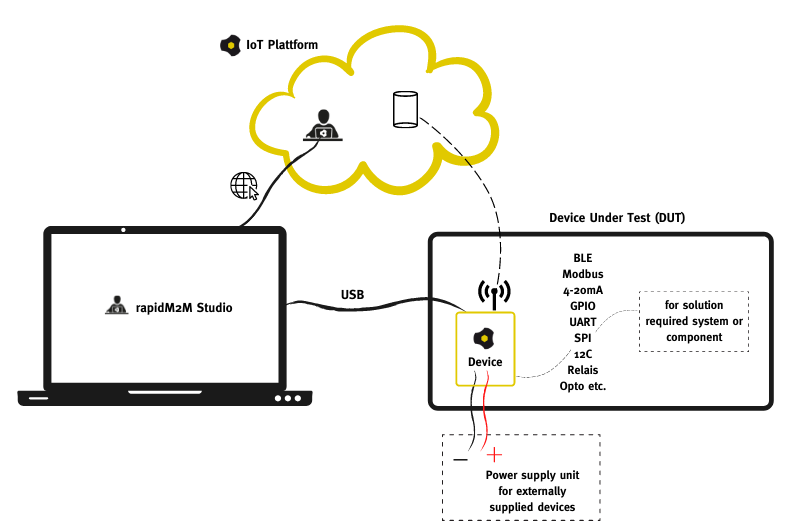
An IoT application always consists of a device that is connected to a remote station on the internet and exchanges data. So on the one hand you need a hardware and on the other hand a platform or a cloud solution, between which a data exchange takes place.
On the platform, the data and the applications are managed in the long term. That is why features such as device management are essential if you want to work successfully with the Internet of Things.
At the hardware level, you have to think about the operating conditions, interfaces, sensors, actuators and even the power supply. Click through the configuratorsand put together your individually required hardware. The devices are assembled in-house at Microtronics in the desired version at no extra cost.
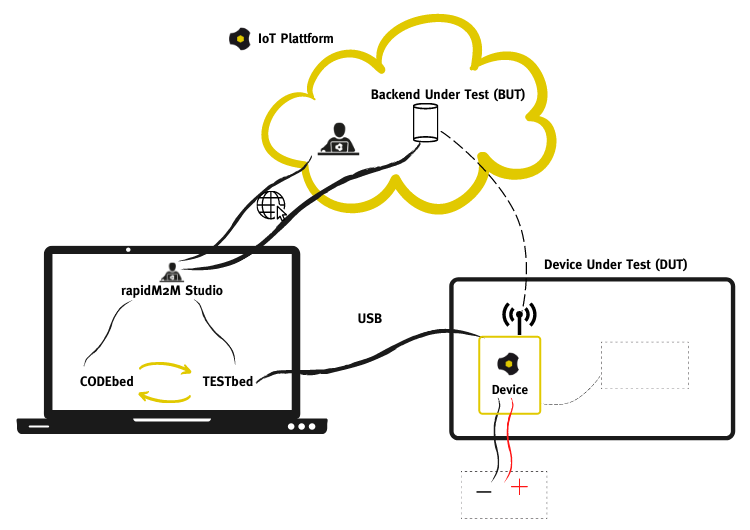
Together, the hardware, with the accessories, the interfaces and the systems and components required for the solution, results in the so-called Device Under Test (DUT for short) from the developer’s point of view. The DUT connects to your PC via USB to develop and test the IoT app. The integrated development environment (IDE for short) rapidM2M Studio runs in the web browser on the PC and can be connected to the device via USB.
Attention:Some USB cables are only designed for power supply. For programming and testing, you need a USB cable with a data line for communication between the PC and the device.
How is an IoT app developed and tested?
The development of the IoT app takes place in the Studio . Access to the free studio can be found in the IoT platform. In the IoT Platform as well as directly in the Studio, you will find a collection of all relevant documents for the development and testing of your application.
- Documentation Getting Started: First Steps to Extensive Examples
- Documentation of the Studio
- Access to the developer community forum: Ask questions and help other IoT developers.
- Quick Start documents in the rapidM2M Studio
- Context-relevant help within the rapidM2M Studio with description and examples for the use of the functions and commands
- Libraries: For the simple use of more complex functionalities and components (for example: Modbus Master Library).
- Basic Examples: Example code blocks to be used like functions
- Demo IoT Apps: Functional demo IoT apps to easily understand and test predefined functions. These contain basic functions, but are not suitable for productive operation. (For example: myDatalogC3 – C3xx 1UI/1Rel Demo )
Your IoT application, is created in the studio using CODEbed and TESTbed developed.
In CODEbed, developers programme the application. Using TESTbed, the IoT app is tested on the DUT and on the Backend Under Test (BUT for short – the BUT is thus the remote terminal on the Internet). Logic and Portal View (POV for short) are executed at the BUT backend.
The Microtronics hardware and platform synchronises data and configurations when DUT and BUT are connected. The TESTbed is used to monitor the data and the programme sequence via USB on the DUT. Furthermore, data and statuses are visualised at the BUT using TESTbed. The TESTbed, in combination with DUT and BUT, enables the verification of the desired behaviour as well as debugging in case of an error. For the developers, this creates a cycle between CODEbed and TESTbed.
The development pattern leaves the developer’s workplace. What next?
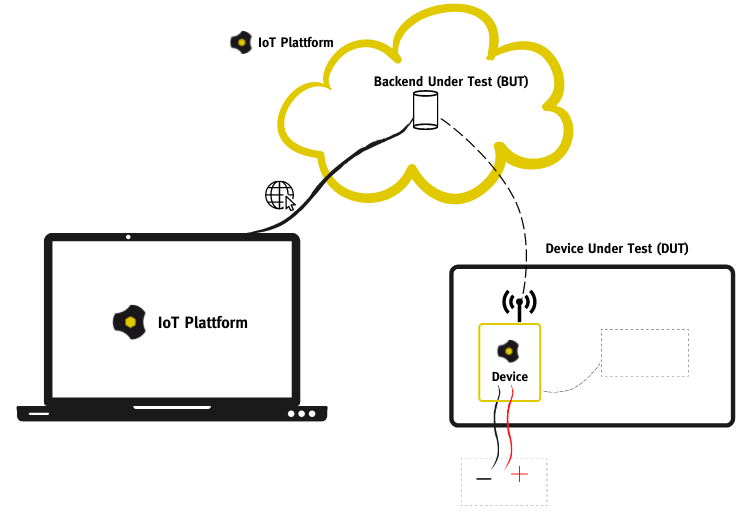
Once the first version of the IoT app is ready, you can start tests. At this point, the DUT is no longer needed at the developer’s workplace. The DUT is installed under controlled conditions in the future environment. According to the developed solution, the device connects to the IoT platform and synchronises the measurement data, configurations and files.
Developers now have the ability to view device and server logs in the IoT platform. If application logging has been integrated into the development, it is possible to track which states and functions the IoT app, and thus the device, is running through. If errors are detected, a new version of the IoT app can be installed over-the-air (OTA) without removing the device from the field.
The connection of the device via USB with the rapidM2M Studio is therefore only necessary for the development per se, but not for later updates of the IoT app in the field. Device management, revisions and update functionalities enable smooth operation.
Conclusion
The rapidM2M Studio development environment is a free development and test environment for your IoT apps. Context-relevant help, libraries and demo IoT apps simplify developers’ work and speed up development time. Build on easily scalable solutions and components instead of reinventing the wheel from scratch.
Register in the IoT platform and get your access to the development world of secure and stable IoT apps.
Glossary
IoT as a Service: includes connectivity, infrastructure and provides powerful developer tools such as the Studio
IoT Platform: Server/cloud on which the data is stored and sites/applications are managed
Studio: web-based development environment for developing and testing IoT apps.
Device under Test (DUT): Development hardware that is connected to the studio via USB for testing.
Backend under Test (BUT): IoT platform used for testing
CODEbed: area in the studio for developing and compiling the source code
TESTbed: Area in the studio for testing with a locally connected device (DUT) and the associated IoT platform (BUT).
IoT App: The IoT app is the actual application that is developed. It contains all the applicative logic for an IoT application.
Backend Logic (BLO): Programming logic that is executed on the IoT platform. Data from several sites or external services can be integrated. The Backend Logic is an optional part of the IoT App.
Portal View (POV): Enables a customised graphical user interface (UI). Data from multiple sites can be used. The POV is an optional part of the IoT app.
